
How to test your school workflow with demo data
Follow one student from a lesson and attendance to an invoice and recorded payment. Check the amounts before entering your own school data in Intelligence Cloud.
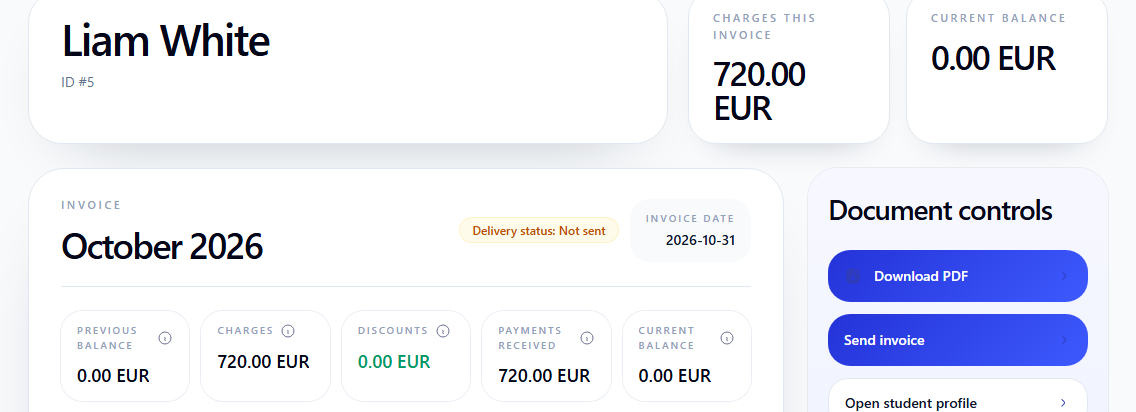
Start with one student rather than browsing every section. Find their group and a lesson, check attendance, then open the invoice and a recorded payment. By the end, you should be able to explain the amount due from the actual records, without a separate spreadsheet calculation.
This example follows Liam White in English Teens A. His October invoice includes 13 lessons: 12 chargeable lessons at 60 EUR and one lesson without a charge. His 1380 EUR payment is allocated to two months: 660 EUR to September and 720 EUR to October. His October balance is zero. Names, dates and amounts may differ in your demo company; keep the same student throughout the check.
1. Open the demo or prepare your own company
Click Open demo on the website to enter a prepared workspace. Its existing demonstration names are English; you can choose the interface language in your profile. Use it to explore the application, and keep your school's personal data and real payments out of it.
If you have registered and want to try your own empty company:
- Open Company settings → General info. Check the country, currency, time zone and date format. The company settings manual explains how to save each field.
- Choose the application language in Profile before generating demo data. New demonstration records use the user's language, while prices and financial amounts use the company's currency. Changing the interface language does not translate names already saved in the company.
- Return to Dashboard. Once the basic settings are complete, select Generate demo data instead. Wait for the operation to finish and the populated dashboard to appear.
Do not clear or regenerate a company containing your school's records just to run this check. The prepared demo is sufficient for a first look.
Extra controls depend on the services available to the company. An excused absence without a charge, discount settings, teacher payout calculations and the student portal require their respective features. If a control is missing, check whether that feature is available before changing attendance marks.
2. Choose a student and their group
Open People & classes → Students, search by surname and click the student's row. Check their groups in the profile. Keep the student's name and one group name handy for the attendance and invoice checks.

Expected result: you know which lessons to find and whose invoice to open. Switching to another student halfway through prevents a useful comparison.
3. Find a lesson and check attendance
Open Schedule, choose the relevant week and find a lesson for that group. Check its date, time and teacher. Then open Attendance, find the same date and open the lesson cell. You can also open attendance from the lesson in the schedule.
Check two independent settings in the student's row:
- P / A records presence or absence.
- R / E sets the billing treatment: R bills the lesson normally; E removes the charge. E is available when excused-absence handling is enabled.
Presence alone does not make a lesson chargeable, and absence alone does not cancel a charge. Use P + R for an ordinary attended, chargeable lesson; A + R for a chargeable absence; A + E for an absence without a charge. If T is available, it marks a transferred absence, whose charge follows the company's transfer policy. Apply discount controls whether the lesson participates in the discount calculation; it does not record a payment.
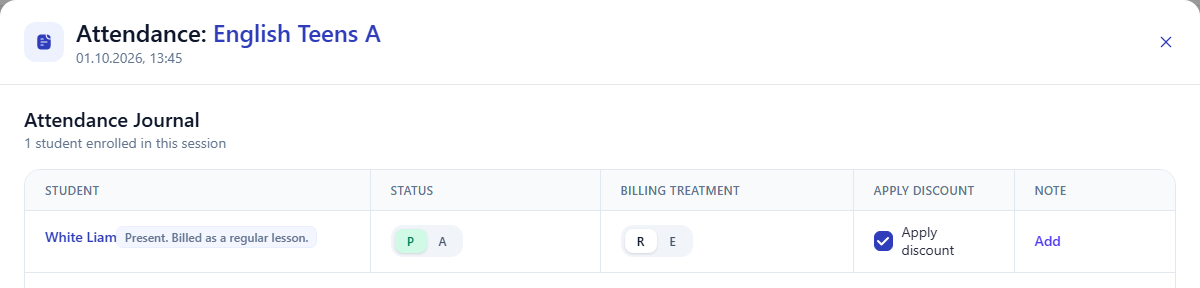
In the illustrated lesson on 1 October 2026 at 13:45, Liam has P and R selected: he attended and the lesson is billed normally. We will check this exact lesson date in his invoice.
You do not need to change anything to inspect the example; close the window with Cancel. If you separately test a change in the demo, click Save attendance, then find that lesson in the invoice. The attendance manual explains the controls in detail.
4. Check the same lesson in the invoice
Open Finance → Invoices. Select the same student and the period containing that lesson. Review the summary amounts, then open the group's lesson rows and find the matching date.
Publishing the schedule creates the initial charges. Attendance and billing treatment can subsequently adjust them. The invoice row should match the lesson date, group and billing treatment; its amount depends on the price effective on that date and applicable discounts.

October includes 12 chargeable lessons at 60 EUR and one lesson without a charge: 12 × 60 + 0 = 720 EUR. There are no discounts or previous balance in this example. The invoice has 720 EUR in allocated payments, leaving 0 EUR due.
Expected result: you can explain the selected lesson charge and the month's total. A PDF or a delivery status does not prove that money was received; that requires a recorded payment. See the invoice manual for the row and summary checks before sending.
5. Find the payment and check its allocation
Open Finance → Payments, find the same student and click their payment. Check the amount, date and Billing allocation section in the view window.

This is Liam's payment dated 7 October. Of the 1380 EUR received, 660 EUR is allocated to September and the remaining 720 EUR settles October. That is why the October invoice shows 720 EUR in payments received, rather than the entire 1380 EUR payment. The payment manual explains how to register and review payments.
Expected result: the allocations add up to the payment — 660 + 720 = 1380 EUR. The October allocation matches the amount used in that invoice. Do not add a second payment simply because the full payment exceeds October's lesson charges.
What to check before using your school's records
Make sure you can answer four questions:
- Where do you find a particular student's lesson and attendance mark?
- Why was that amount charged for the lesson?
- How was the recorded payment allocated between periods?
- Why does the student have a debt, a zero balance or credit?
If an amount is unclear, return to the source record: check the price effective on the lesson date, billing treatment, discount and payment allocation. Do not adjust the invoice total just to make it match an expectation.
Then configure your school's rules and start with a small set of real records. The demo helps you learn the actions; your own prices, absence policies and payment deadlines need a separate check.
Related resources
How student payments are matched with invoices and balances
Learn how student payments are matched with invoices, previous debt, partial payments, overpayments, credit, and student balances in training center billing.
How to configure company settings
Set the school name, country, currency, time zone, date format, invoice due dates, and payment instructions before daily work begins.
Student Billing Software for Training Centers
Learn how training centers and language schools can create student invoices, record payments, track unpaid balances, and connect billing with lessons and attendance.