
How to Configure Email Templates for Invoices and Access Invitations
Step-by-step instructions for customizing student invoice emails, student portal invitations, and staff access invitations in Intelligence Cloud.
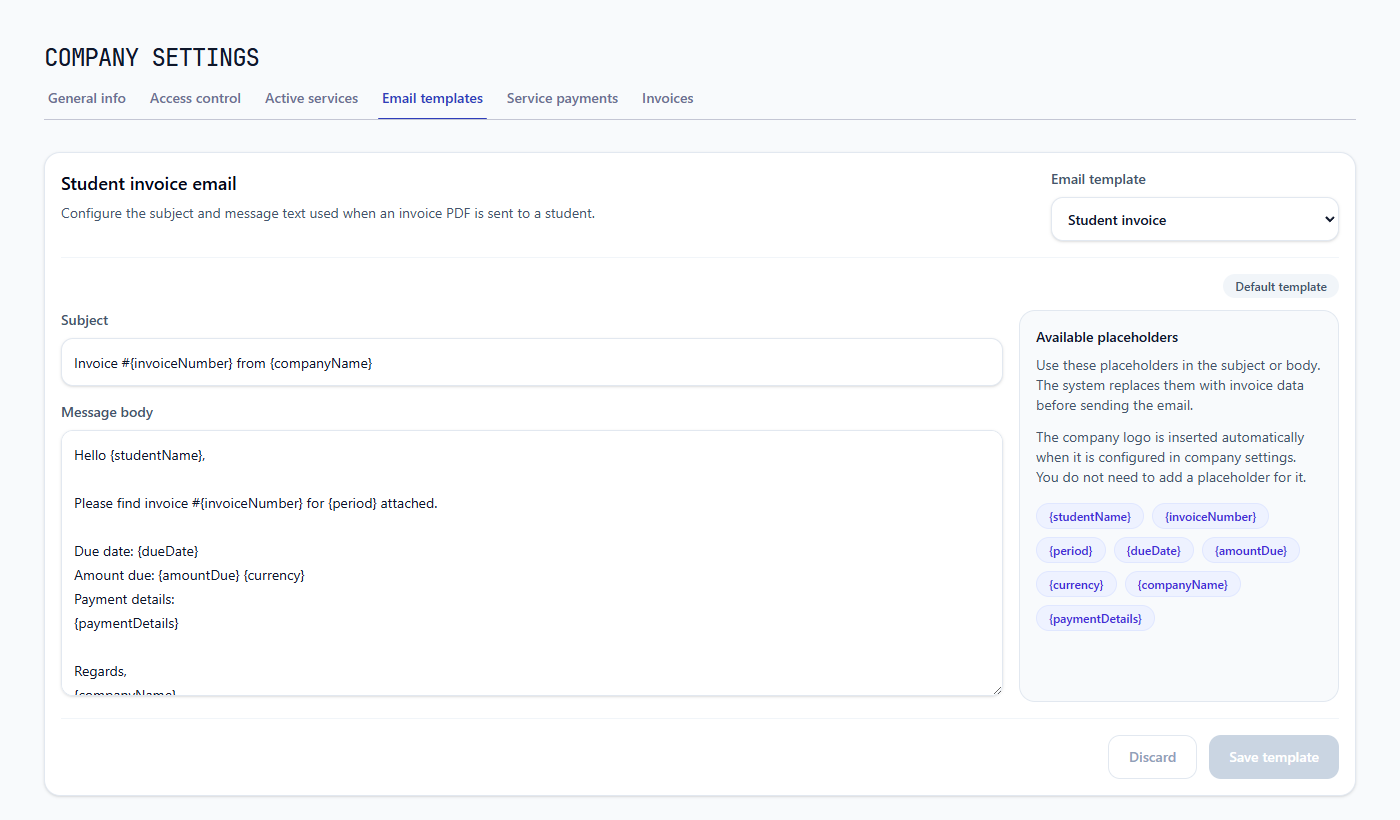
Intelligence Cloud uses reusable templates for operational emails sent from the school workspace. The school owner can customize the wording once and keep student, invoice, company, and access details connected to the records that trigger each message.
The same settings page controls three separate templates:
- Student invoice for emails sent with a student invoice PDF;
- Student cabinet invitation for inviting or re-inviting a student to the student portal;
- Staff access invitation for inviting or re-inviting a teacher or another employee to the backoffice.
Changing one template does not change the other two.
Open the email template settings
Sign in as the company owner and open Company settings -> Email templates. The Email templates tab is available to the owner because its messages can include financial information and access setup links.
Use the Email template selector in the upper-right corner to switch between the three message types. The editor shows:
- Subject: the email subject line;
- Message body: the text shown before the recipient follows a link or opens an attached invoice;
- Available placeholders: variables replaced with current data when the message is sent;
- Default template or Custom template: whether the workspace is still using the supplied text or a version saved by the owner.
Understand placeholders before editing
A placeholder is written inside braces, for example {studentName} or {companyName}. Keep the spelling and capitalization exactly as displayed in Available placeholders.
When an email is sent, Intelligence Cloud replaces each placeholder with data from the relevant student, invoice, company, or staff access record. Do not type a real student name, invoice number, amount, or setup link into a reusable template.
The system rejects unknown placeholders when the template is saved. This prevents a misspelled variable from being delivered as unexplained technical text.
Configure the student invoice email
Select Student invoice when you want to change the email sent with an invoice PDF.
Available invoice placeholders are:
{studentName}: the invoice recipient's student name;{invoiceNumber}: the generated invoice number;{period}: the billing period represented by the invoice;{dueDate}: the invoice due date;{amountDue}: the amount still due;{currency}: the invoice currency;{companyName}: the school or company name;{paymentDetails}: the payment instructions selected for that student.
A practical subject is Invoice #{invoiceNumber} from {companyName}. In the message body, keep {amountDue}, {currency}, {dueDate}, and {paymentDetails} close enough that the student can understand what to pay, when to pay, and how to pay.
The company logo is inserted automatically when it is configured in Company settings. Do not add a logo placeholder.
For the complete invoice review, PDF, send, resend, and delivery-history workflow, see how to send student invoices by email.
Configure the student portal invitation
Select Student cabinet invitation to edit the message sent when a school invites or re-invites a student to the portal.
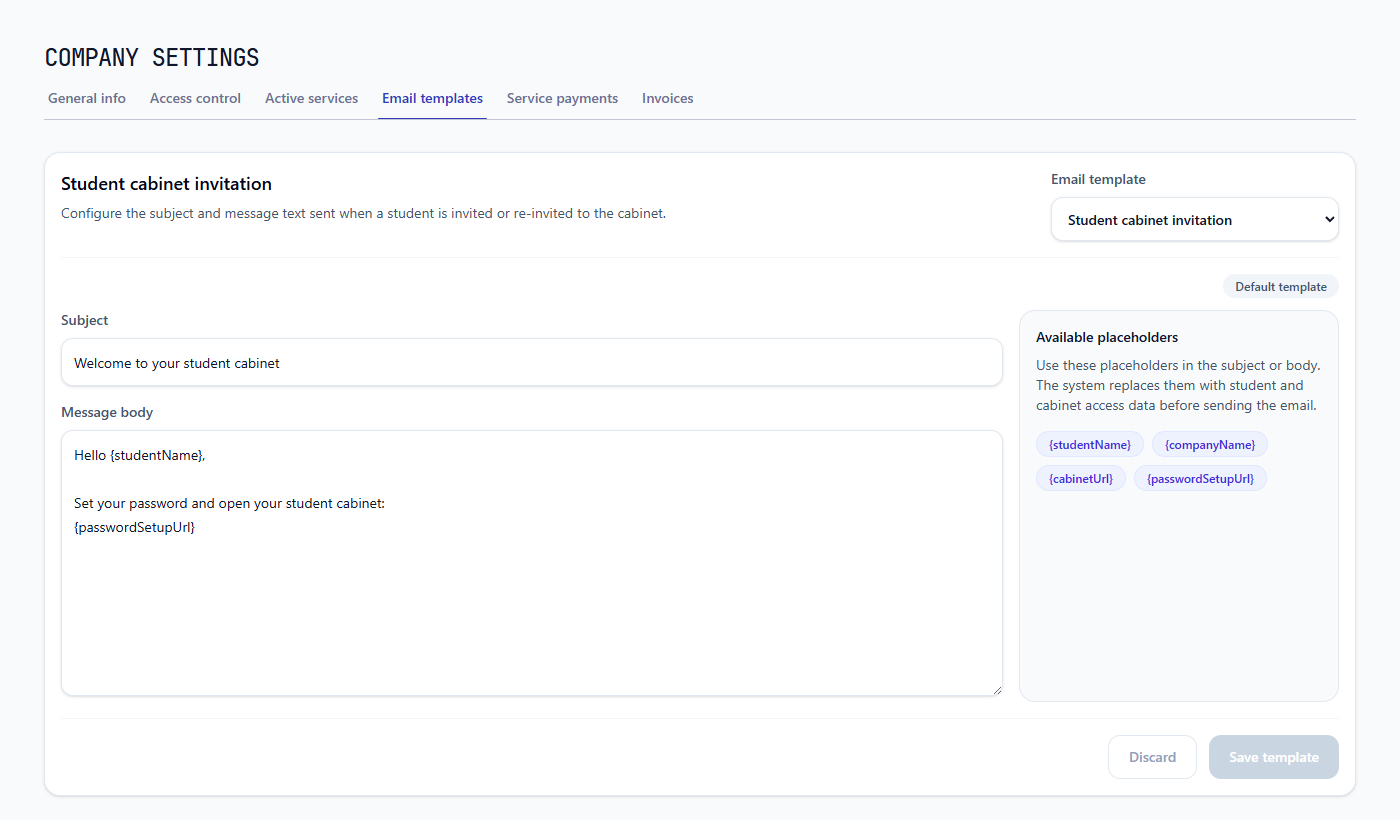
Available student invitation placeholders are:
{studentName}: the invited student's name;{companyName}: the school or company name;{cabinetUrl}: the student portal address;{passwordSetupUrl}: the individual link used to create or reset the account password.
Keep {passwordSetupUrl} in the message body. Without this link, a first-time recipient cannot complete account setup from the invitation. {cabinetUrl} gives the student the normal portal address to use after the password is created.
The template applies to invitations and re-invitations sent after it is saved. The administrator still controls which student receives access from the student's profile. That process is covered in how to invite students and manage portal access.
Configure the staff access invitation
Select Staff access invitation to customize the shared invitation used for teachers and other school employees who receive backoffice access.
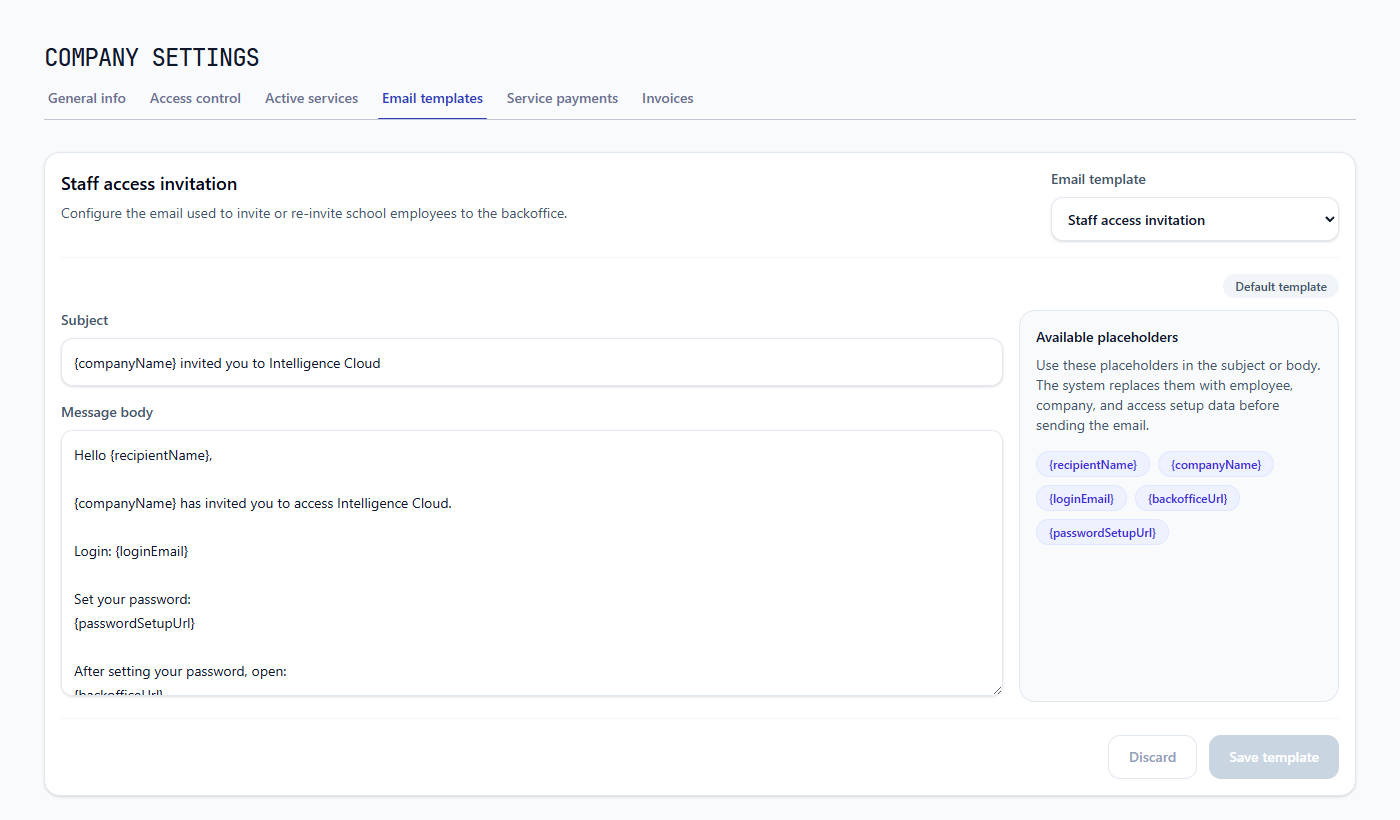
Available staff invitation placeholders are:
{recipientName}: the invited employee's name;{companyName}: the school or company name;{loginEmail}: the email address the employee must use to sign in;{backofficeUrl}: the normal backoffice sign-in address;{passwordSetupUrl}: the individual password setup link.
Keep both {loginEmail} and {passwordSetupUrl} in the message so the recipient can identify the correct account and finish setup. {backofficeUrl} remains useful after activation as the regular sign-in destination.
This is a shared staff template. Its wording should work for a teacher, administrator, manager, or other employee instead of promising access to a section that only one role can use.
Save or discard the changes
After editing the selected template:
- Review the Subject and Message body.
- Confirm that every placeholder appears in the Available placeholders panel.
- Click Save template.
- Check that the status changes to Custom template.
Use Discard before saving when you want to remove the unsaved edits and return to the last loaded version. Discard does not remove a custom template that was already saved.
When the new wording takes effect
The saved template is rendered when a future email is sent. It applies to:
- the next student invoice email;
- a new or repeated student portal invitation;
- a new or repeated staff access invitation.
Changing a template does not rewrite an email that was already delivered. If the recipient needs the new wording or a new setup link, use the relevant resend action after saving the template.
Final check before using a custom template
Before relying on a new template for regular operations:
- make the sender and purpose clear in the subject;
- keep the recipient's next action near the top of the message;
- retain the placeholders required for amounts, payment instructions, login details, or setup links;
- avoid wording that assumes every staff member has the same permissions;
- send one real operational message and verify the rendered values, links, PDF attachment, and logo.
Email templates control message wording. They do not grant access, calculate an invoice, change payment details, or determine who receives a message. Those decisions remain in the student, invoice, and staff access workflows.
Related resources
How to send student invoices by email
Learn how Intelligence Cloud sends student invoice PDFs by email, uses invoice due dates, and inserts school payment details into the message.
How to Add Employees and Teachers and Manage Access
Add employees or teachers to Intelligence Cloud, assign the right access, and manage invitations without exposing unrelated school data.
How to Invite Students to the Student Portal and Manage Access
Step-by-step instructions for inviting a student, checking activation, resending an invitation, deactivating access, and inviting the student again.